3D Printing Workshop
29 March 2014 / pedagogy A Family Workshop in Critical 3D Printing:
Concepts, Techniques, and Workflows
Developed by Golan Levin and Gustavo Valera
Originally commissioned by Alhondiga de Bilbao, July 2013
as an activity accompanying the exhibition Artists as Catalysts.
Presented in another iteration at FutureEverything, Manchester, March 2014
Overview
The rapidly decreasing cost and widespread adoption of 3D printers has been aided and accompanied by new software applications that make 3D modeling simpler for everyday people. This workshop is an introduction to 3D modeling and 3D printing for families and educators. Participants will learn the use of several free 3D modeling applications (including the Autodesk 123D suite, TinkerCAD, Sculptris, and Skanect) — as well as the use of the Makerbot Replicator, an inexpensive 3D printer widely used in schools and hackerspaces. The workshop will also present the many different ways in which people around the world are using 3D printing to create useful, expressive, and critical objects.
This workshop is designed for 8-12 participants. The recommended format is: one workshop leader, one technical assistant, 8-12 participants (or participating families), in a room with a video projection, worktables and comfortable chairs, and readily available WiFi and electric power. The workshop may last as little as 3 hours, or (for more advanced participants) two days.
This workshop is suitable for families. It is recommended that kids should be older than 7 or 8 years, and have basic skills in reading and computer-mousing. Participants are expected to bring their own laptops and (if possible) an iPhone or iPad.
Basic workshop equipment assumptions.
- The host organization and/or workshop leader should have available:
- Mac OSX laptop with OSX 10.8+ and Google Chrome browser installed
- Makerbot Replicator or similar consumer 3D printer (ideally, 2 printers)
- Internet connection and video projector
Optional additional equipment provided by the host/leader:
- Microsoft Kinect sensor (preferably model 1414)
- Apple iPad running recent iOS
- Calipers and/or Micrometer
- Playdoh (for capture with 123D Catch)
- Pre-made examples of 3D printed objects, for discussion
- Scraper tools, scissors, sandpaper, acetone
- Superglue
Workshop Software
Primary Workshop Software:
- Makerbot Makerware. Converts STL CAD models into printfiles for Makerbots.
- TinkerCAD. Simple 3D modeling in the browser, produces downloadable STL files.
- 3DTin. Simple 3D modeling in the browser, even more lightweight.
- Sculptris. Freeform modeling in a clay-like process.
Additional/Optional Software:
- Blender. Powerful free modeling software.
- Sketchup. Quick and easy modeling, especially of architectural forms. Huge 3D library.
- 123D Design. Easy yet powerful modeler for 3D printing (desktop & browser).
- Leopoly. Easy freeform modeling, good for the kids.
- Netfabb. Repairs STL models with errors (for example, if they’re not “watertight”).
- MeshLab. For previewing STL models, and some kinds of editing/repair.
- Kinect to STL. Captures a 3D portrait with a Kinect, ready-to-print.
- OpenSCAD. A programming language for creating 3D objects.
Optional iOS App Software from Autodesk:
- 123D Creature. Manipulate an underlying “skeleton” in order to design a 3D printable creature.
- 123D Catch. Use your camera to capture the things around you as sharable, printable 3D models.
- 123D Sculpt. General sculpture for the iPad.
A quick overview of 3D printing
Common Workflows.
Nowadays, people:
- Design objects using CAD software
- Print them out using 3D printers
- Share them freely on websites like Thingiverse
- Download other people’s designs, then modify/customize/improve them
- Share the modified designs back with the community
- Buy or sell 3D prints through Shapeways or other service bureaus
- Example: my NeoLucida store on Shapeways sells my eyepiece designs.
- They offer a huge range of materials! e.g Shapeways; Ponoko
3D Printing Technologies.
- There are now many kinds of 3D printers. They build up objects additively. They cost from $500 to more than $500,000. The Makerbots we’re using today cost about $2000.
- Machines like Makerbot, Ultimaker, RepRap, Cubify print plastic (generally ABS or biodegradable PLA) in a process called FDM (fused deposition modeling) or FFF (fused filament fabrication).
- Formlabs and Objet Connex printers, among others, use cured liquid plastic, with a much higher resolution, in a process called SLA (stereolithography).
- Other machines can melt metal and ceramic powders, in a process called SLS (selective laser sintering) or SLM (selective laser melting).
Access to 3D Printing Equipment.
You can get access to 3D printers:
- In university design, architecture and mechanical engineering departments
- With the help of mail-order service bureaus like
- Shapeways
- Ponoko
- Sculpteo
- You can make a 3D printer yourself! (RepRap, costs about $500 to make)
- In office-supply stores like FNAC, Staples or Office Depot
- In an MIT-network FabLab (such as this one in Manchester)
- In your local Hackerspace! (such as these in Manchester)
- Increasingly, in people’s homes and offices
Where do 3D models come from?
- Design them yourself using CAD software (3DTin, TinkerCAD, SolidWorks, etc.)
- Scan a real object using a Kinect with Skanect, 123D Catch, or a
- Download (and upload) free models from sharing sites like: Thingiverse or CubeHero
- 123D App gallery http://www.123dapp.com/Search/Index.cfm?keyword=car
- The Pirate Bay “physibles” site (many cautions apply)
- Use professional 3D scanning hardware ($~80K) or 3D scanning services
- Low-cost “prosumer” 3D scanners such as Makerbot Digitizer or David Laserscanner
- Structured light scanners and other open-source scanners
- The world’s first 3D scanning photo booth
- Purchase 3D models from commercial sites like: TurboSquid and CGTrader
- With Minecraft, using Printcraft!
Some other ways of making things.
Remember, 3D printing is just one part of the modern fabrication shop, which also includes:
- Laser cutters
- CNC routers, lathes, and mills
- Vinyl cutters
- CNC embroidery machines
- Vacuum forming machines
- Water-jet cutters and plasma cutters
- And good old machine tools and hand tools!
Don’t forget Hand-Shaping!
There are some new Maker materials for hand-shaping that complement 3D printing very well. These are very useful for making custom grips, etc:
Computational Form Generation
Some designers and artists are writing software that generates 3D models:
- Nervous System “collaborative design” CellCycle Ring Creator
- OpenSCAD, a programming language for CAD
- Thingiverse Customizer, for parametric objects made in OpenSCAD
- Example: Fraction Blocks; a parametric object lession
What do people do with 3D printing?
Is 3D printing just for toys and useless knick-knacks?
At first blush, it could seem that way.
Well, people make useful items:
- Plastic bag carrier (Thingiverse), 3D printed bag hook
- Battery adapter (Thingiverse)
- Cable organizer (Thingiverse)
- 3D printed padlock
- 3D printed clock (designed by a crowd)
- 3D printed flute
- 3D printed violin
- What else can you find?
Expressive work.
People make art, architecture and design, often experimental.
- Sculpture, such as by Michael Rees, Robert Lazzarini
- Industrial Design: Nervous System’s lamps & jewelry
- Architecture: A 3D printed room; a 3D printed house
- Fashion: 3D printed shoes
- Art History: Metropolitan Museum on Thingiverse
Medical Assistance.
3D printing can be used to help people overcome medical needs and disabilities.
- 3D printed exoskeleton lets Emma, a little girl with arthrogryposis, raise her arms.
- 3D printed hand for children born without fingers
- 3D printed exoskeletal casts for broken bones
- Scott Summit’s prosthetic limbs (YouTube)
- Baby with collapsed bronchus, saved by a 3D printed device that restored breathing
- Dutch woman with 3D printed lower jaw, and another set of facial bone implants
- 3D printed skull implant (hardcore)
- Good old dental models
Helping Animals.
- Beauty, a bald eagle given a 3D printed beak.
- Buttercup, a duck given a 3D printed foot.
- Homes for hermit crabs
Dangerous Things.
3D printing is also becoming controversial, and has some dangerous implications.
Critical Making.
Various artists are now using 3D printing to create “critical objects”. These objects offer a critical perspective on privacy, politics, consumer culture, and commercial media.
- Free Universal Construction Kit by Golan Levin & Shawn Sims
- Merrick lamp by Daan van den Berg
- Screwmocracy by Addie Wagenknecht (NSFW)
- Grand Old Party by Matthew Epler (NSFW)
- Kyle McDonald has made some critical variations of the Liberator gun
- Heather Dewey-Hagborg’s “Stranger Visions” portraits generated from DNA
Workshop Exercises
Introductory Exercises. (Day One)
Discover. (15 minutes)
Browse Thingiverse.com and find:
- Something “useful” that you might even use yourself
- Something expressive or artistic that you find interesting, beautiful or funny
Make I. (15 minutes)
Using 3DTin, make a flat “medallion” of your initial. Export an STL and print it out.
Make II. (30 minutes)
Using the Kinect, scan a person to make a 3D portrait, and print it out. [Alternate: use 123DCatch to scan a person using a collection of photos, iPhone or iPad. Further editing may be necessary.]
Make III. (45 minutes)
Using Sculptris make a character or animal figurine. Export the model as an OBJ file. Convert the OBJ to an STL using Meshlab or the Autodesk 3D Print Utility, and print it out. Make an account on Thingiverse and share your figurine.
Advanced Exercises. (Day Two)
These are suitable for a second session with adults, but may be outside the scope of a workshop for children.
Modify/Mashup.
We will use Tinkercad to modify objects made by others.
- Download an STL file from Thingiverse (or paste its URL into TinkerCad); using TinkerCad, customize or personalize it. Note that there is a 25MB limitation to the size of uploaded files.
- Download two STL files from Thingiverse; using TinkerCad, stick them together to create a mashup.
Adapt.
Using calipers or a micrometer, measure something in the environment and make a clamp, handle, adapter, or fixturing point for it. Try to use widespread, standard physical protocols. (Consider the ingenuity of the Bottle Cap Tripod, http://photojojo.com/store/awesomeness/bottle-cap-tripod/). Common adaptions might be:
- Adapt to support a 1/4″-20 bolt (for mounting a camera),
- Allow to connect Lego/Duplo bricks, so that it’s easy to mount Lego there
- Add a holder for iPhone, coffee cup, pens, etc.
Solve.
Look around and solve a problem with a simple design. Consider the “useful items” listed above.
Repair.
Fix something broken that you bring from home.
Code.
Use OpenSCAD, or Processing and the ToxicLibs library, to generate a parametric STL file.
Fabrication Concerns
Some things to keep in mind.
Here’s a quick list of some things to keep in mind when modeling & printing, especially for mechanical parts:
- Material cost
- Undercuts and support material
- Print orientation
- Infill
- Minimum thickness (wall thickness)
- Accuracy, precision, and deviation
- Clearance
- Loose pieces
Undercuts and support material. Printers like the Makerbot can’t easily print objects with undercuts (e.g. like a standing ‘T’) because there’s nothing to support the upper material. Fancier printers use a dissolvable support material. FDM/FFF machines like the Makerbot can, however, print a lightweight scaffolding that can easily be snipped off.
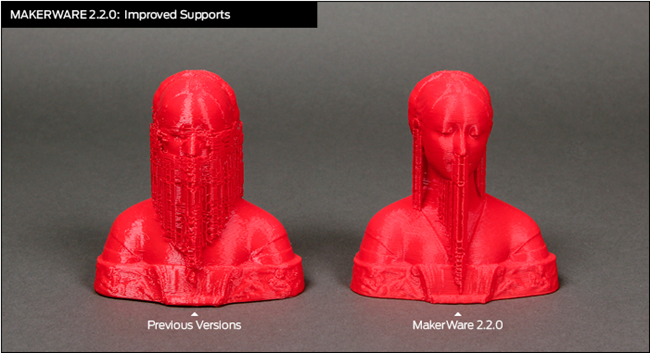
Print orientation. The orientation with which something is printed can make a big difference for how much support material must be printed. Consider the difference between printing T and ⊥. Furthermore, the print orientation can also affect how the part behaves under physical stress.
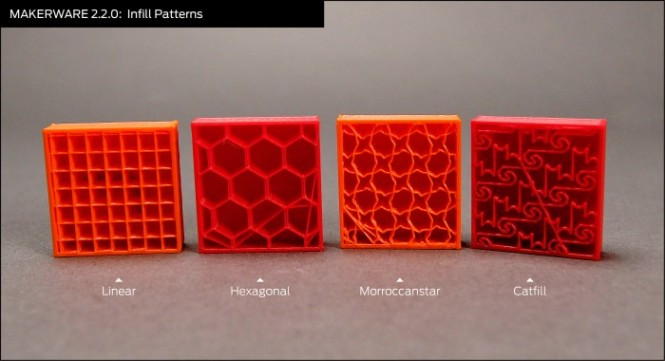
Infill. 3D printing a lot of material can get expensive, whether because of the cost of the material itself, or because of the time necessary to print it. Makerware solves this by allowing you to specify the density of an interior honeycomb.
« Prev post: Response to an Invitation
» Next post: Malofiej Presentation: Graffiti+Infovis